Plan Your Golf Vacation
(800) 576-1570
Cougar Point Golf Course
Following an extensive 10-month renovation in tandem with Gary Player Design, Cougar Point reopened on October 1, 2017 to rave reviews—winning over Kiawah Island golfers with its dramatic marsh vistas and superior playability. Whether you’ve played the old Cougar Point or have never stepped foot on its greens, this renovated course is a must-play at the resort.
Cougar Point’s short and long par-4s, great risk/reward 5s and extremely scenic and challenging par-3s demand that you approach your round with a smart strategy.
- Yardage:
351
Handicap: 13 - Yardage:
340
Handicap: 13 - Yardage:
319
Handicap: 13 - Yardage:
282
Handicap: 13 - Yardage:
248
Handicap: 11
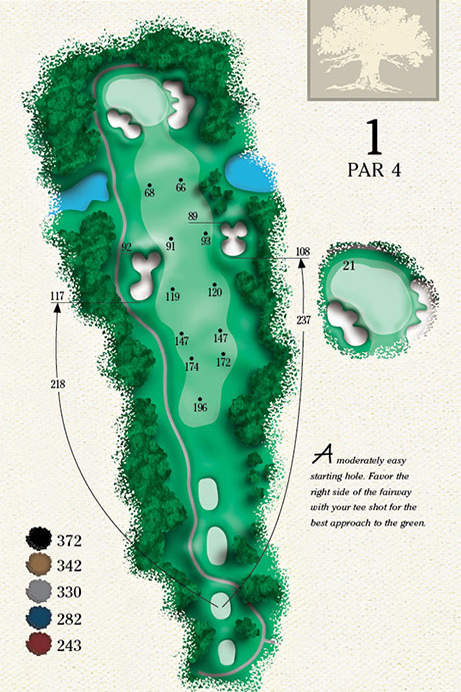
Gary Player’s opening hole is a relatively easy par 4. The short starting hole features two large fairway bunkers that put more of a premium on accuracy than length, as the bunker on the left is reachable by most players. The smart play is to hit a 3-wood off the tee, which will still leave a short iron into the green.
- Yardage:
175
Handicap: 17 - Yardage:
162
Handicap: 17 - Yardage:
143
Handicap: 17 - Yardage:
125
Handicap: 17 - Yardage:
104
Handicap: 13
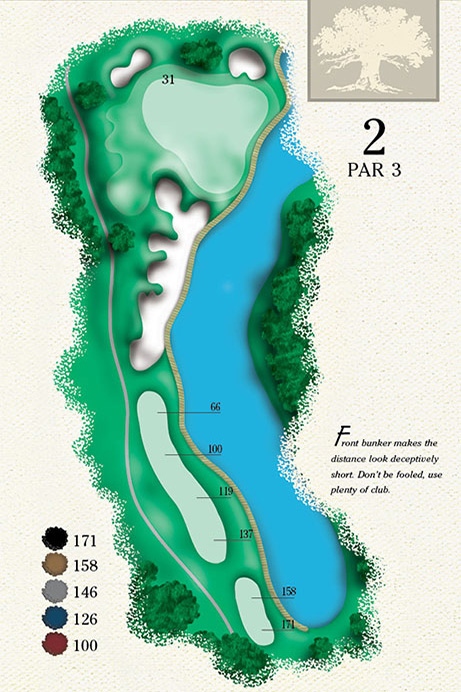
This beautiful par 3 is just past the resort’s front gate, making it one of the guests’ first impressions. Water runs along the entire right side of the hole and really comes into play for a hole location on the right side of the green. A front hole location not only brings the water into play, but also a large bunker that runs the length of the hole.
- Yardage:
554
Handicap: 5 - Yardage:
535
Handicap: 5 - Yardage:
505
Handicap: 5 - Yardage:
474
Handicap: 5 - Yardage:
437
Handicap: 1
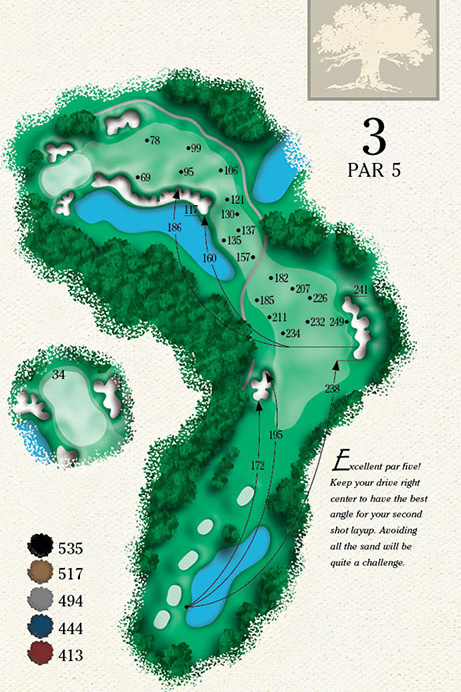
Hole 3 is a true risk/reward par 5 that is reachable in two by the longer hitters, but a missed second shot can end up in the water or in one of the many bunkers. Even the lay-up is a risk/reward shot where players can opt to take off more of the corner to have a shorter third shot bringing the water and bunkers into play.
- Yardage:
458
Handicap: 1 - Yardage:
436
Handicap: 1 - Yardage:
402
Handicap: 1 - Yardage:
375
Handicap: 1 - Yardage:
333
Handicap: 5
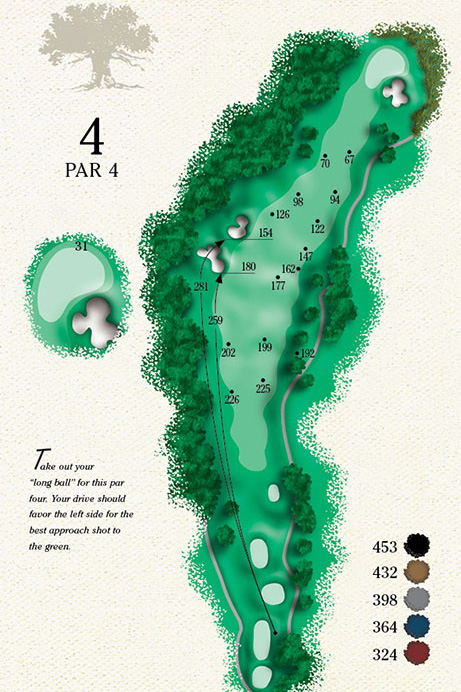
After three relatively easy opening holes, the course becomes much more difficult as it moves out to its signature stretch of holes along the Kiawah River. Although Hole 4 is very long and usually plays into the wind, it offers a very generous fairway—just avoid the fairway bunkers on the left side. From the left side of the fairway, players can run the ball onto the green. The angle is much more difficult from the right side, as two greenside bunkers and the marsh come into play.
- Yardage:
398
Handicap: 7 - Yardage:
393
Handicap: 7 - Yardage:
367
Handicap: 7 - Yardage:
335
Handicap: 7 - Yardage:
309
Handicap: 3
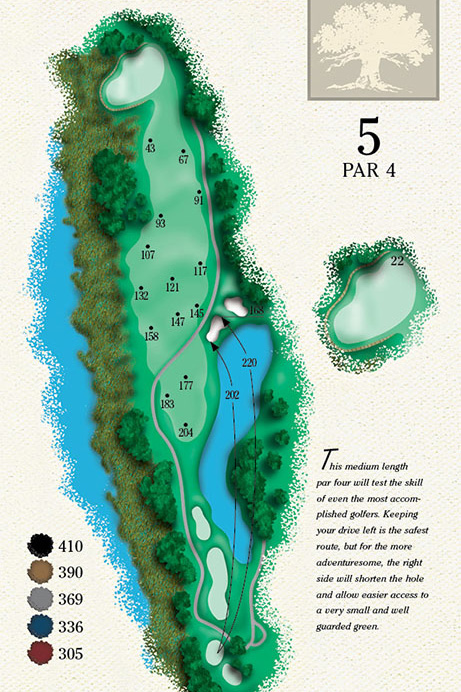
Hole 5 plays parallel to the Kiawah River on the left side. The marsh area runs from the tee all the way to and around the green, creating a very difficult approach when the hole is on the left side of the green.
- Yardage:
182
Handicap: 15 - Yardage:
166
Handicap: 15 - Yardage:
162
Handicap: 15 - Yardage:
142
Handicap: 15 - Yardage:
102
Handicap: 17
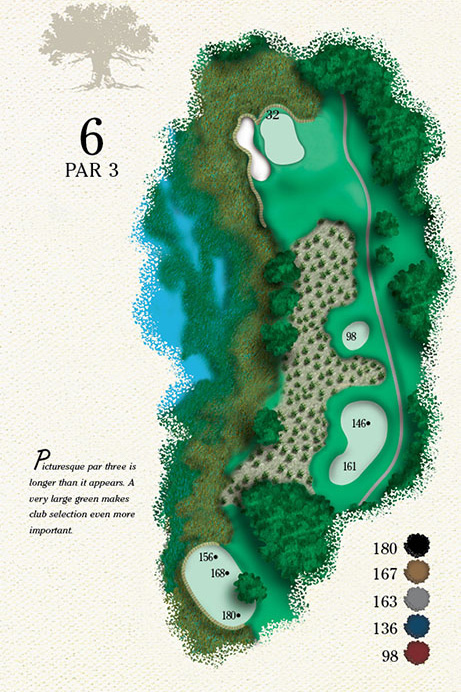
The back tee boxes of this par 3 are set in the marsh, forcing a carry over a natural area with a lateral hazard down the entire left side and behind the hole. There is more room short of the green that you can see from the tee, making this a much more visually intimidating hole than it actually is.
- Yardage:
351
Handicap: 9 - Yardage:
335
Handicap: 9 - Yardage:
311
Handicap: 9 - Yardage:
289
Handicap: 9 - Yardage:
252
Handicap: 9
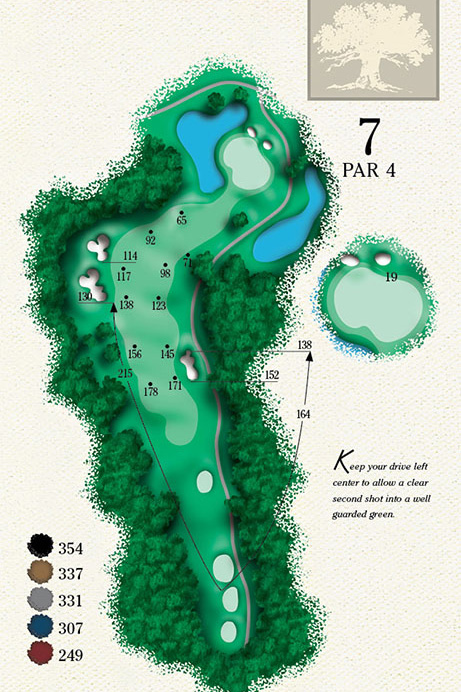
This dogleg left par 4 is a lay-up hole from the tee that places a premium on accuracy, as a tee shot that is short or right will leave a blocked second shot because of massive oaks. Long-ball hitters can try to hit a drive past the trees and through the dogleg but a ball that goes too far will be in the pond protecting the green.
- Yardage:
360
Handicap: 11 - Yardage:
340
Handicap: 11 - Yardage:
320
Handicap: 11 - Yardage:
285
Handicap: 11 - Yardage:
229
Handicap: 15
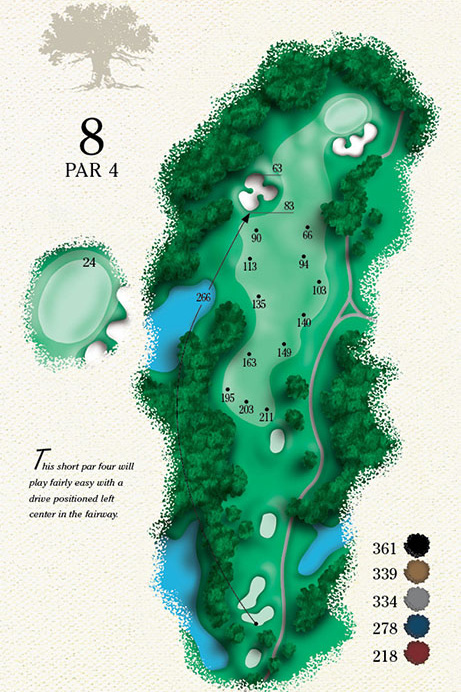
Hole 8 is another fairly simple par 4 that places a premium on accuracy off of the tee. The smart play is to hit a 3-wood or long iron to keep the ball in the left side of the fairway, avoiding the large fairway bunker in the left rough and a blocked approach shot from the right rough.
- Yardage:
550
Handicap: 3 - Yardage:
536
Handicap: 3 - Yardage:
501
Handicap: 3 - Yardage:
461
Handicap: 3 - Yardage:
403
Handicap: 7
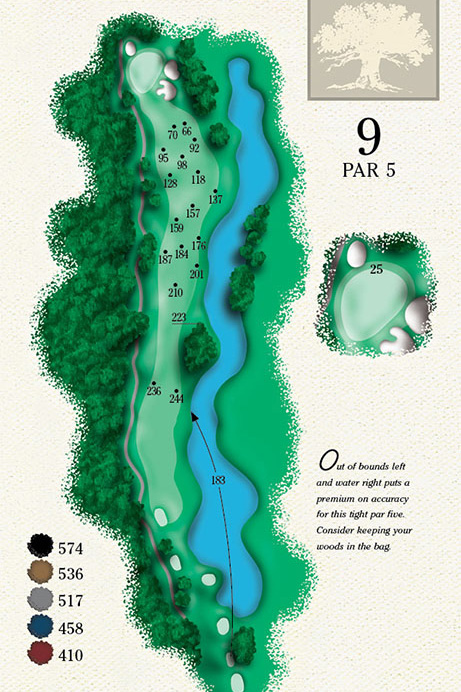
Hole 9 is a reachable par 5 with a good tee shot that avoids the water on the right side and out of bounds on the left. If the player opts to lay-up, the best play is to the right center of the fairway, leaving a good angle to the green while avoiding trees that will block an approach played from the left rough.
- Yardage:
435
Handicap: 2 - Yardage:
409
Handicap: 2 - Yardage:
389
Handicap: 2 - Yardage:
348
Handicap: 2 - Yardage:
289
Handicap: 10
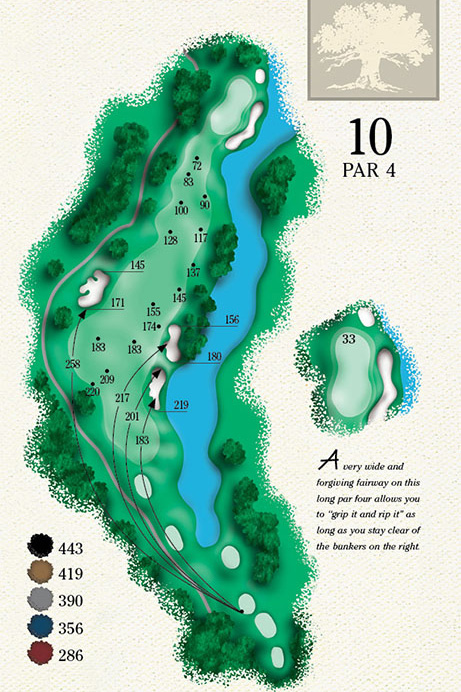
This long par 4 typically plays into the wind with an uphill approach, making the hole the most difficult on the back 9. The safest line off of the tee is the target bunker in the left rough, but long hitters can aim over the water to try to cut off distance for the approach shot.
- Yardage:
489
Handicap: 10 - Yardage:
474
Handicap: 10 - Yardage:
455
Handicap: 10 - Yardage:
411
Handicap: 10 - Yardage:
340
Handicap: 14
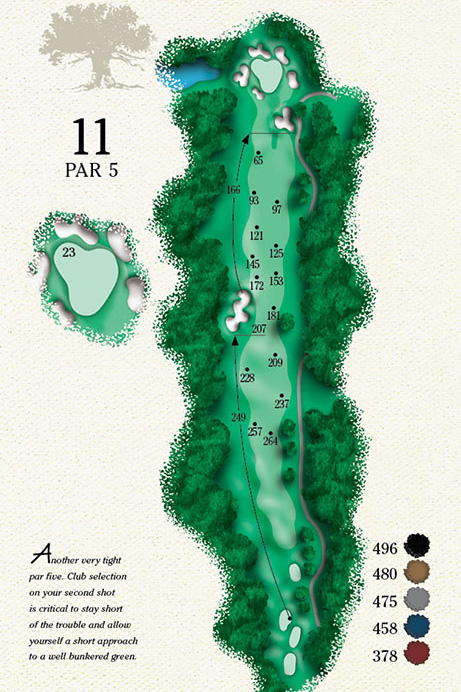
Long hitters must avoid the large fairway bunker on the left side of the hole, and two bunkers short right along with one bunker short left of the green makes you think twice about trying to reach this par 5 in two. This is one of the most photographed greens on the island, with a wide array of bunkering and stately oaks framing the hole. It was also one of the holes used in the filming of The Legend of Bagger Vance. In the movie’s opening scene, Jack Lemmon hits his tee shot on this hole then walks off the tee down the fairway to the left rough.
- Yardage:
221
Handicap: 16 - Yardage:
203
Handicap: 16 - Yardage:
190
Handicap: 16 - Yardage:
148
Handicap: 16 - Yardage:
129
Handicap: 18
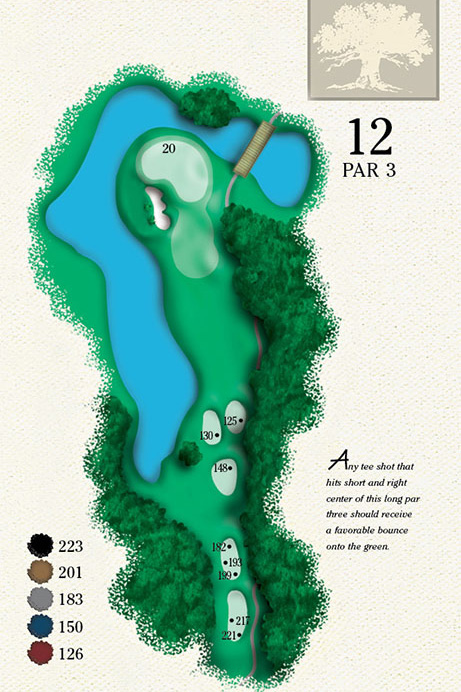
This long par 3 is protected left by a greenside bunker and long by water, but shots that land short and right can bounce onto the green, providing some relief on a difficult hole. It pays to check the wind before leaving Hole 11, as it can be very deceiving from the 12th tee.
- Yardage:
413
Handicap: 8 - Yardage:
388
Handicap: 8 - Yardage:
377
Handicap: 8 - Yardage:
348
Handicap: 8 - Yardage:
291
Handicap: 12
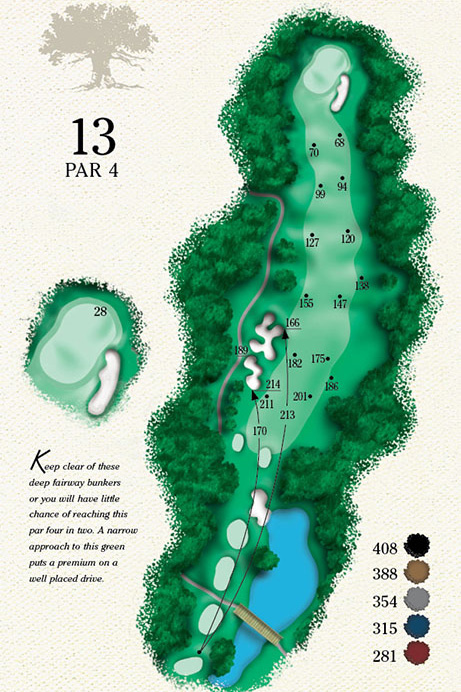
Hole 13 is a short par 4 that rewards accuracy more than length off the tee to be sure to avoid the bunkers and trees that guard the left and right sides of the hole. A 3-wood off the tee leaves a short iron approach to a long green.
- Yardage:
174
Handicap: 18 - Yardage:
169
Handicap: 18 - Yardage:
153
Handicap: 18 - Yardage:
129
Handicap: 18 - Yardage:
114
Handicap: 16
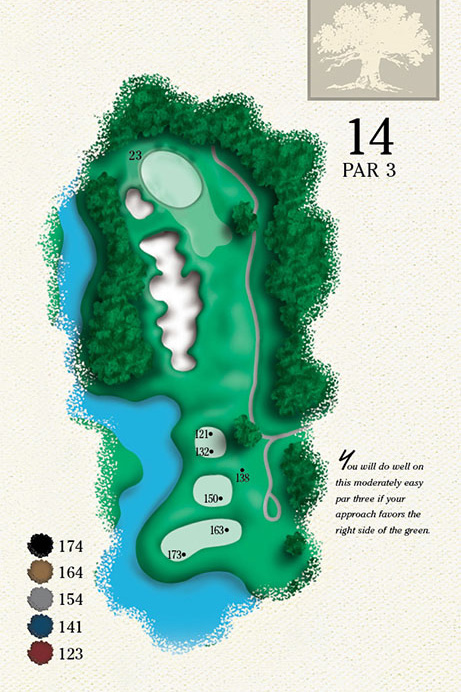
Two bunkers short and left of the green make this par 3 look much more difficult than it actually plays, unless the hole is on the left side of the green. There is a bailout area to the right of the green that makes for a fairly easy up-and-down.
- Yardage:
537
Handicap: 4 - Yardage:
512
Handicap: 4 - Yardage:
496
Handicap: 4 - Yardage:
477
Handicap: 4 - Yardage:
413
Handicap: 2
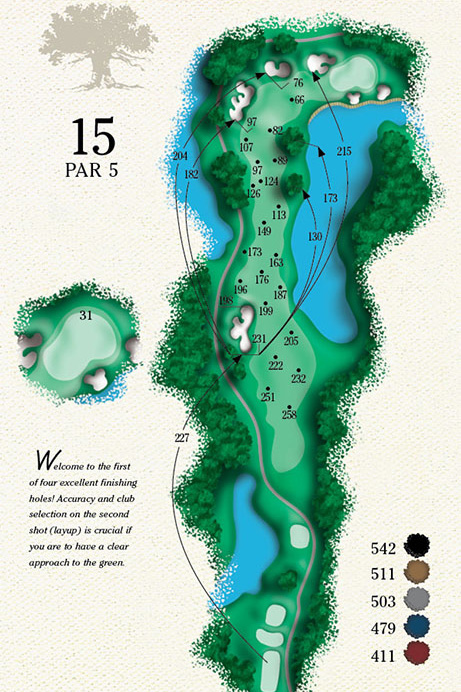
Hole 15 is one of the more difficult par 5s on Cougar Point. The right side of the hole and green are protected by a large pond that longer hitters must carry if they opt to go for the green in two. There is one large oak tree and several bunkers that make the lay-up shot very difficult as well. Players must either lay-up short of the oak, forcing a long iron approach over water or hit it past the oak, which can prove to be too long a shot for many players.
- Yardage:
400
Handicap: 14 - Yardage:
383
Handicap: 14 - Yardage:
361
Handicap: 14 - Yardage:
332
Handicap: 14 - Yardage:
296
Handicap: 6
Players hit out of a shoot of oak trees to a narrow landing area guarded by bunkers on the left and trees on the right. With a deep bunker guarding the front left, a back left pin placement makes for a very challenging par 4.
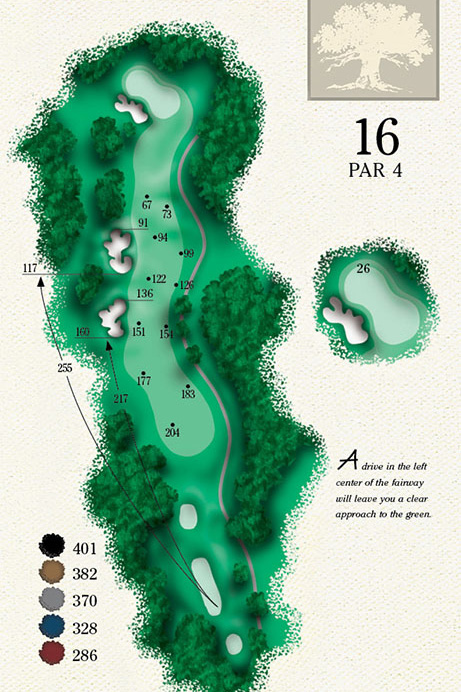
- Yardage:
366
Handicap: 12 - Yardage:
356
Handicap: 12 - Yardage:
331
Handicap: 12 - Yardage:
306
Handicap: 12 - Yardage:
265
Handicap: 8
One of the most scenic holes on the golf course, water plays down the entire right side. This short par 4 gives a player several playing options from the start of the hole. You can play it safe with an iron to the left of the oak, leaving a mid-iron to an undulated green. You can hit a 3-wood over the tree, leaving a wedge or short iron to the green. Or, big hitters can hit over the water and fairway bunkers, leaving a short pitch/chip to the well-bunkered green. Beware of hitting through the fairway though, as a pond is there to take any tee shots hit long and left.
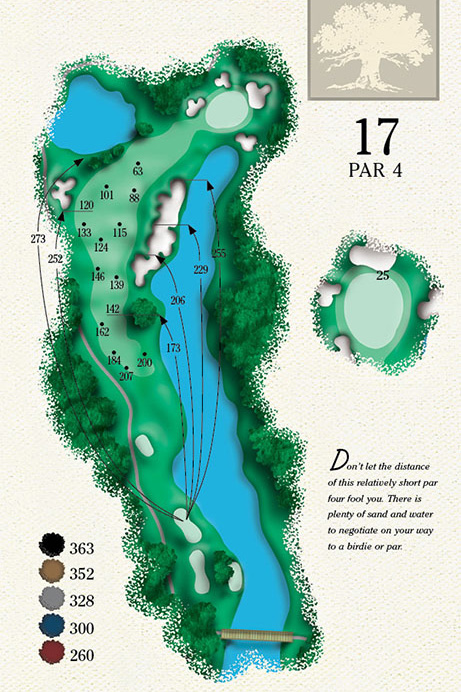
- Yardage:
400
Handicap: 6 - Yardage:
377
Handicap: 6 - Yardage:
357
Handicap: 6 - Yardage:
341
Handicap: 6 - Yardage:
262
Handicap: 4
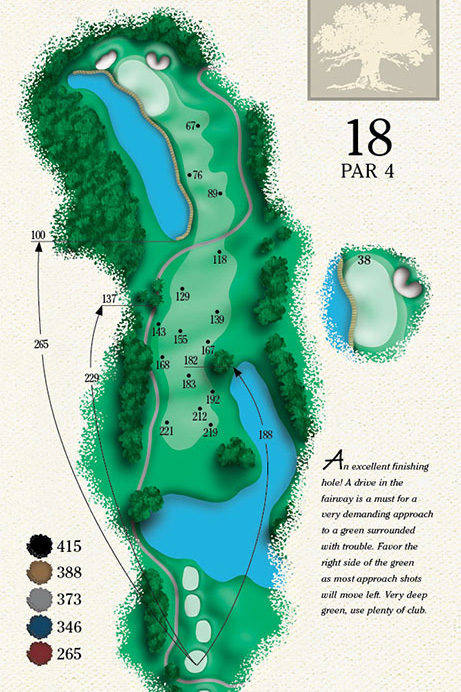
The final hole is a long par 4 with a very unique and difficult green that is protected by water on the left side and a bunker on the right. A good drive is critical on this hole, as a ball too far left or right will leave the player with tree trouble. The second shot must avoid the water on the left side and a bunker on the right. If the hole location is in the bowl of the middle of the green, a shot that misses the green right leaves a very difficult pitch with the water just past the hole.