
Plan Your Golf Vacation
(800) 576-1570
Osprey Point Golf Course
What began as a members-only golf course on the island noted for its playability has evolved into a championship-level course with a world-class layout that was completely renovated in 2014 under the direction of course architect Tom Fazio. Today’s Osprey Point still delivers on its playability and natural beauty and gets rave reviews for its pristine conditions and elegant clubhouse.
Each hole on Osprey Point is unique and memorable—with four challenging par-3s, four extremely distinctive par-5s and ten outstanding par-4s ranging in length from 340 to 461 yards.
- Yardage:
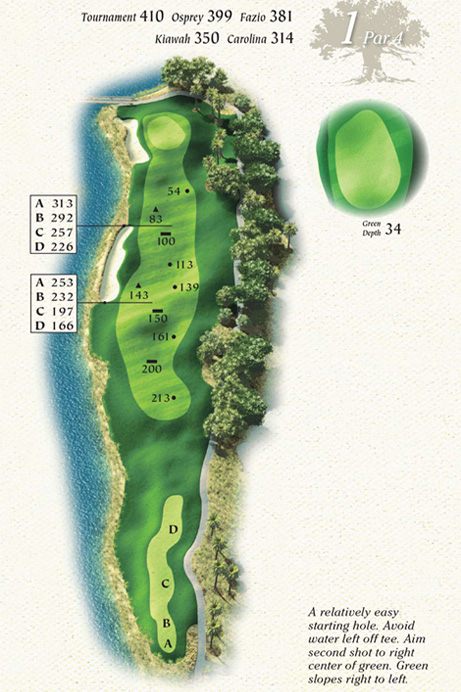
410
Handicap: 11 - Yardage:
399
Handicap: 11 - Yardage:
381
Handicap: 11 - Yardage:
350
Handicap: 10 - Yardage:
314
Handicap: 10
Tom Fazio sets the theme early for Osprey Point with very generous fairways and greens, along with natural lagoons playing down the left side of many of the holes. This modest opening hole usually plays into the wind. The generous fairway is tree-lined all down the right side, opening up with a relatively easy green that slopes gently right to left.
- Yardage:
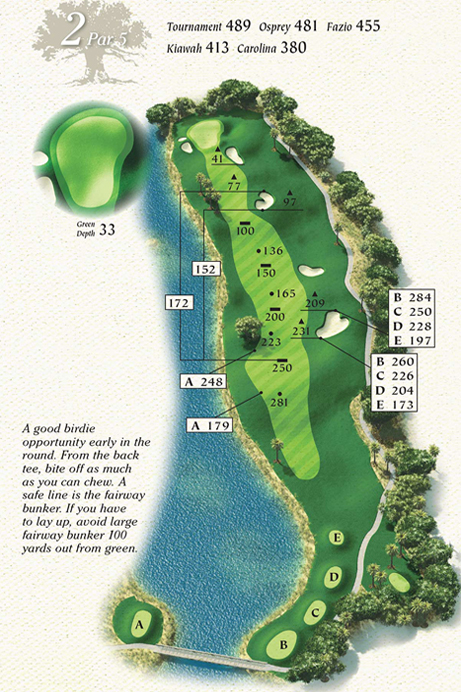
489
Handicap: 15 - Yardage:
481
Handicap: 15 - Yardage:
455
Handicap: 15 - Yardage:
413
Handicap: 12 - Yardage:
380
Handicap: 12
Although Egret Pond runs the length of the left side on this expansive par 5, Fazio has provided abundant room on this hole. This is a wide fairway with numerous depressions, mounds and bunkers in the right rough, but not so challenging that a par or birdie is out of the question. Play smart to avoid the sand and you will be sure to enjoy this hole.
- Yardage:
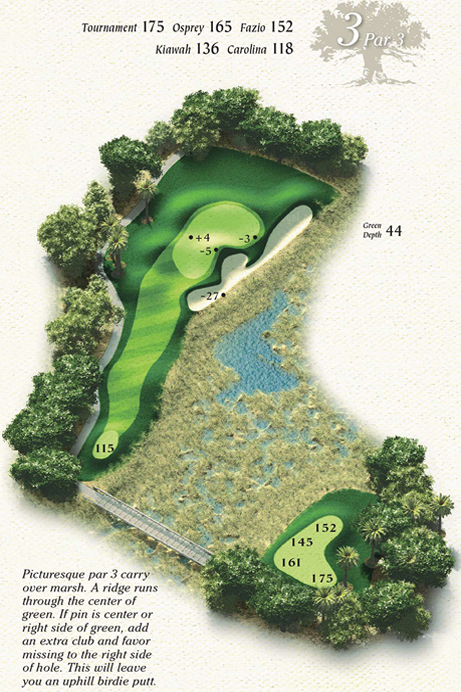
175
Handicap: 7 - Yardage:
165
Handicap: 7 - Yardage:
152
Handicap: 7 - Yardage:
118
Handicap: 18 - Yardage:
118
Handicap: 18
This beautiful par 3 takes wonderful advantage of the island’s natural setting by playing over a small expanse of Lowcountry salt marsh. Although hard to tell from the tee, this is a large, deep green. There are a bunker and marsh fronting the green, so keep this in mind when choosing your club. The wind does tend to blow across the marsh and can be difficult to read in the flag or feel on the tee.
- Yardage:
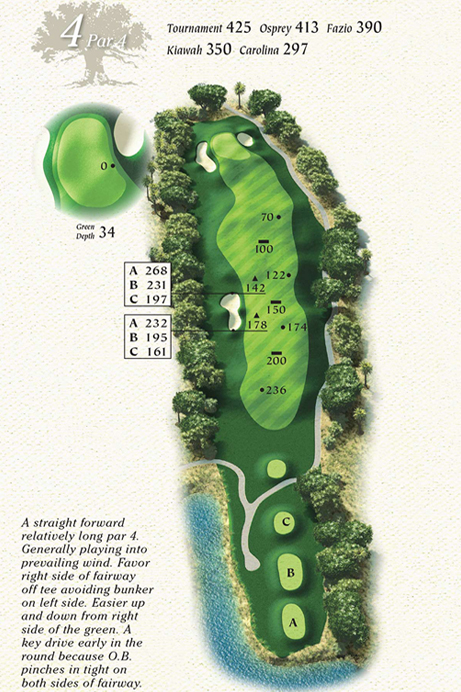
425
Handicap: 3 - Yardage:
413
Handicap: 3 - Yardage:
390
Handicap: 3 - Yardage:
350
Handicap: 4 - Yardage:
297
Handicap: 4
This straight, tree-lined par 4 has plenty of fairway, but is flanked by a large fairway bunker on the left and a cluster of live oaks on the right. This deep green is also guarded on each side by large bunkers. As one of the longer par 4s, running your second shot into this green can be a smart play.
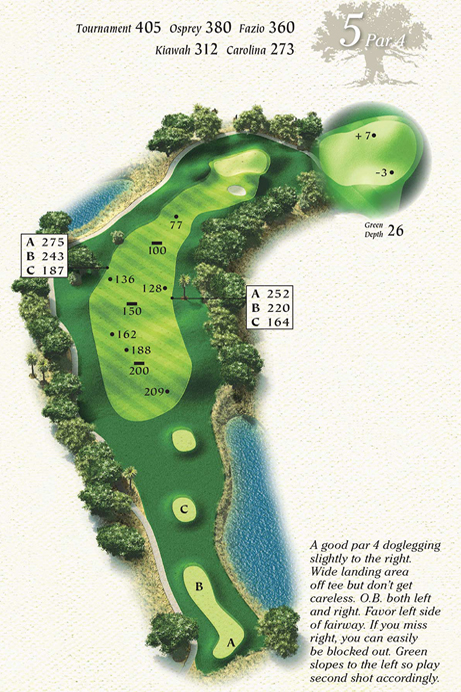
- Yardage:
405
Handicap: 5 - Yardage:
380
Handicap: 5 - Yardage:
360
Handicap: 5 - Yardage:
312
Handicap: 8 - Yardage:
273
Handicap: 8
Hole 5 is the only true dogleg par 4 on the course. With a wide fairway that sweeps left-to-right, it is most ideal for your tee shot to favor the left side. This provides the best angle into a deceptively large green. The greenside bunker is built into a mound guarding the right side of the green, resulting in a blind approach shot when the hole is placed right of center.
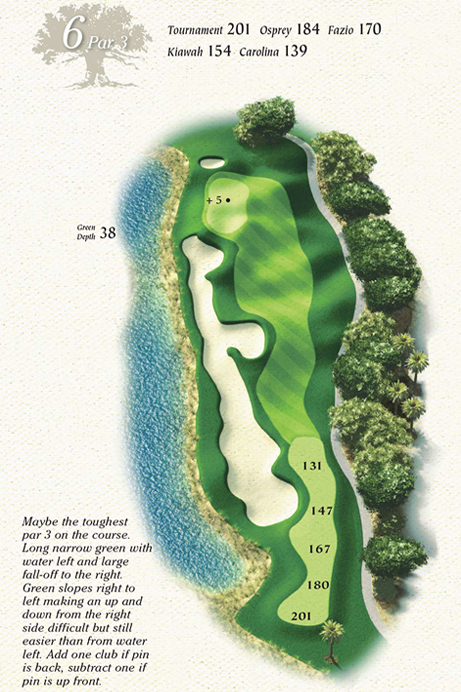
- Yardage:
201
Handicap: 9 - Yardage:
184
Handicap: 9 - Yardage:
170
Handicap: 9 - Yardage:
154
Handicap: 16 - Yardage:
139
Handicap: 16
Although not the main hazard, water again lurks down the entire left side of this hole. It is accompanied by a long, meandering bunker up to the front of the green. The narrow, but deep, green has grass depressions left of the green to save balls from rolling into the water. There is plenty of room right off the green, although you will face a challenging up-and-down from a collection area that is below the green.
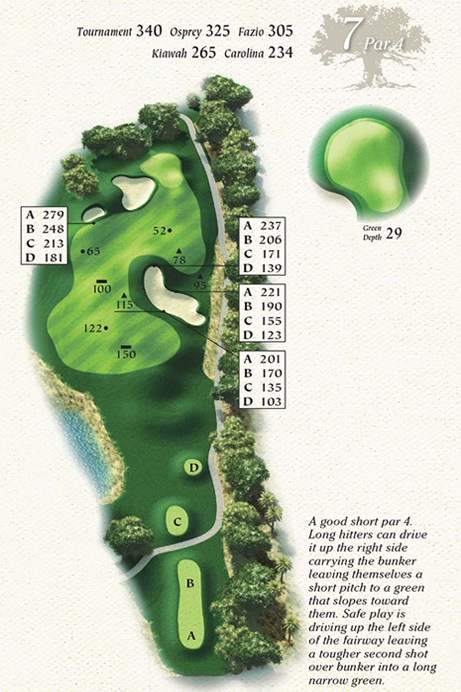
- Yardage:
340
Handicap: 17 - Yardage:
325
Handicap: 17 - Yardage:
305
Handicap: 17 - Yardage:
265
Handicap: 14 - Yardage:
234
Handicap: 14
Although Hole 7 is the shortest par 4 on the course, it is not without its defenses. The smart tee shot should be aimed at the left fairway bunker, but carefully staying short of it. Although this position avoids the large bunker right of the fairway, the short approach shot will be challenged by another large bunker that guards the left side of this green. For those players bold enough to attempt driving this green, you must first carry the large fairway bunker down the right side.
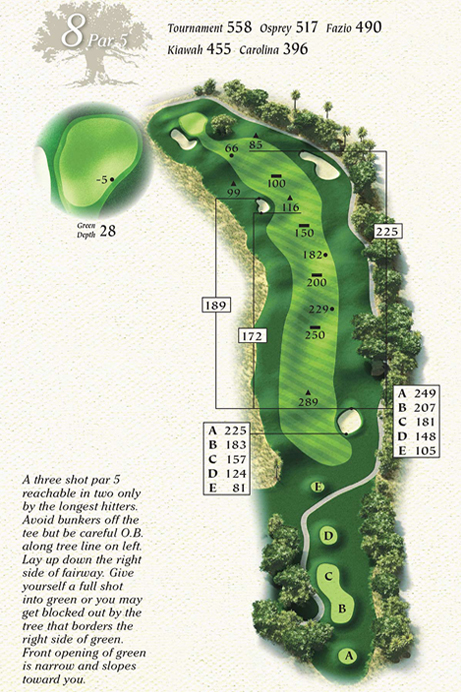
- Yardage:
558
Handicap: 13 - Yardage:
517
Handicap: 13 - Yardage:
490
Handicap: 13 - Yardage:
455
Handicap: 6 - Yardage:
396
Handicap: 6
The ideal tee shot favors the right side of the fairway. With the fairway moving to the left around two large oak trees, your second shot should favor the middle to right side of the fairway. From here, you should be rewarded with a short iron into a small green with a narrow approach. A deep bunker guards the left side of this green while a smaller bunker is positioned under the right front.
- Yardage:
461
Handicap: 1 - Yardage:
428
Handicap: 1 - Yardage:
409
Handicap: 1 - Yardage:
336
Handicap: 2 - Yardage:
309
Handicap: 2
This is one of the most challenging tee shots on Kiawah Island. For the shortest route over the water, play to the right of the small fairway bunker. Keep in mind, this will leave a longer shot into the green. The more aggressive line off the tee, left of the fairway bunker, can be rewarded with a much shorter approach shot into the longest par 4 on the course. A large green with a wide approach allows players the option to run their second shot onto the green.

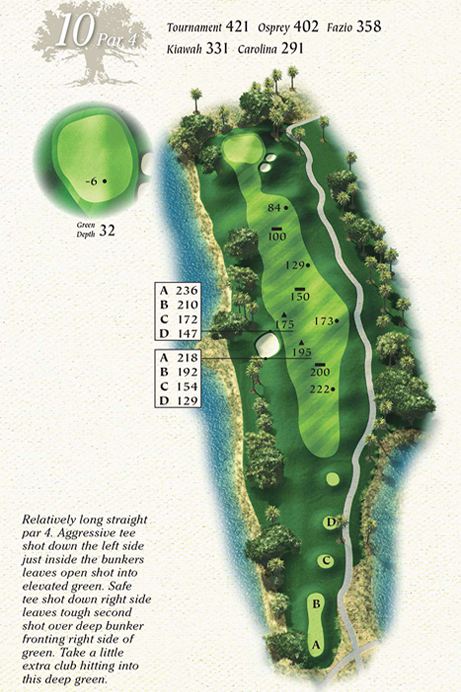
- Yardage:
421
Handicap: 2 - Yardage:
402
Handicap: 2 - Yardage:
358
Handicap: 2 - Yardage:
331
Handicap: 1 - Yardage:
291
Handicap: 1
This is the first of three holes that play along the picturesque Canvasback Pond. Although water runs the length of the left side, it really shouldn’t come into play. Numerous trees in the left rough and a wide fairway make the right half of this fairway the ideal position. This is a large green that is slightly elevated from the fairway, with two small bunkers under the front, right of the green. This makes it difficult to see the putting surface from the fairway. Keep this in mind when choosing your club.
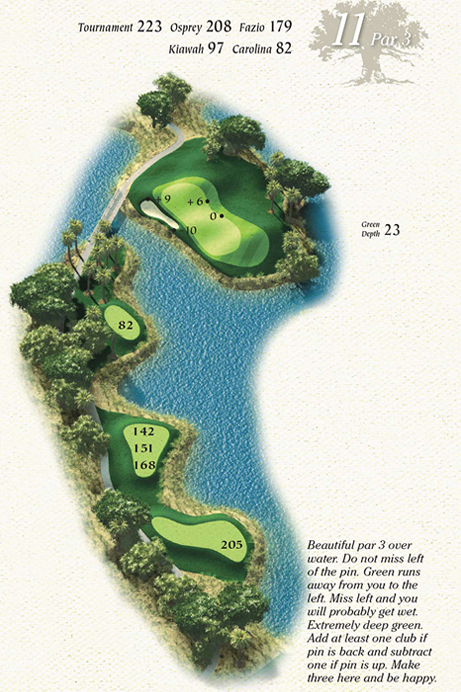
- Yardage:
223
Handicap: 10 - Yardage:
208
Handicap: 10 - Yardage:
179
Handicap: 10 - Yardage:
97
Handicap: 17 - Yardage:
82
Handicap: 17
No matter where you tee it up on this hole, you are faced with water from tee to green. The good news is this is the widest green on the course. The right side tends to be closer to the tee, allowing for a shorter carry. Always keep in mind there is plenty of room to the right of and behind this green from which to play.
- Yardage:
535
Handicap: 8 - Yardage:
521
Handicap: 8 - Yardage:
499
Handicap: 8 - Yardage:
428
Handicap: 3 - Yardage:
400
Handicap: 3
The main design feature of this hole is the early dogleg right of the fairway, around an enormous fairway bunker that is populated by an oak and a few palmetto trees. Keep it in the fairway and you should have a good opportunity for par or better. This green is receptive but guarded on both sides by three bunkers.

- Yardage:
357
Handicap: 16 - Yardage:
323
Handicap: 16 - Yardage:
314
Handicap: 16 - Yardage:
303
Handicap: 11 - Yardage:
257
Handicap: 11
Another challenging short par 4 that will test your tee shot. The wise play off the tee is to lay-up short of the left fairway bunker, taking it out of play, but leaving a longer club into this elevated green. The riskier play is to challenge that bunker, landing just right of it. The fairway will sweep the ball to the right and farther up the fairway, leaving a wedge into this elevated green. The green falls off severely on all sides. To the right is a steep slope of rough and, to the left, a deep bunker.

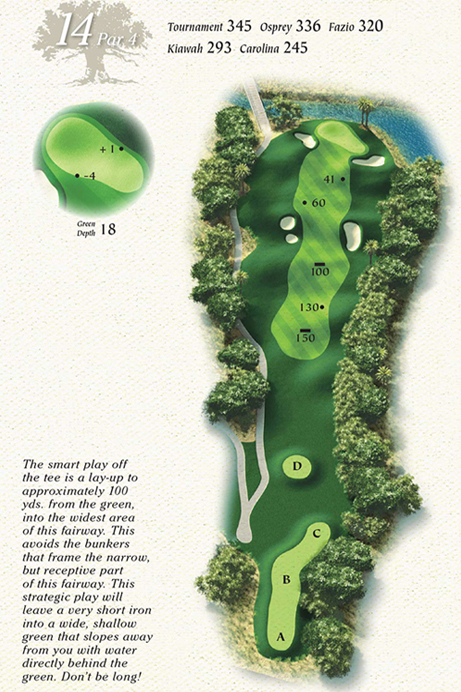
- Yardage:
345
Handicap: 14 - Yardage:
336
Handicap: 14 - Yardage:
320
Handicap: 14 - Yardage:
293
Handicap: 13 - Yardage:
245
Handicap: 13
Hole 14 is the last of the short par 4s. Accuracy off the tee is a must if you want the shortest shot from the fairway. The fairway narrows quite a bit between the bunkers on either side of it. The prudent play may be to stay short of the bunkers, but the more loft and spin you can have into this green, the better your chances of getting the ball close to the hole. Be careful though—too aggressive and your ball may find the pond behind this shallow green.
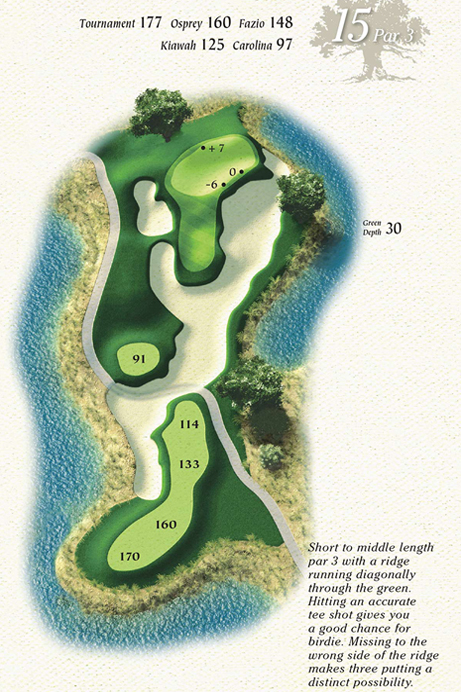
- Yardage:
177
Handicap: 18 - Yardage:
160
Handicap: 18 - Yardage:
148
Handicap: 18 - Yardage:
125
Handicap: 15 - Yardage:
97
Handicap: 15
There may be a lot of sand surrounding this green, but it should really only be in play for right hole locations. The green has a pronounced ridge that divides the front from the back. Although this green is deep, it effectively plays as two greens. Knowing the hole location and proper club selection are critical for back hole locations, which are blind from the tee.
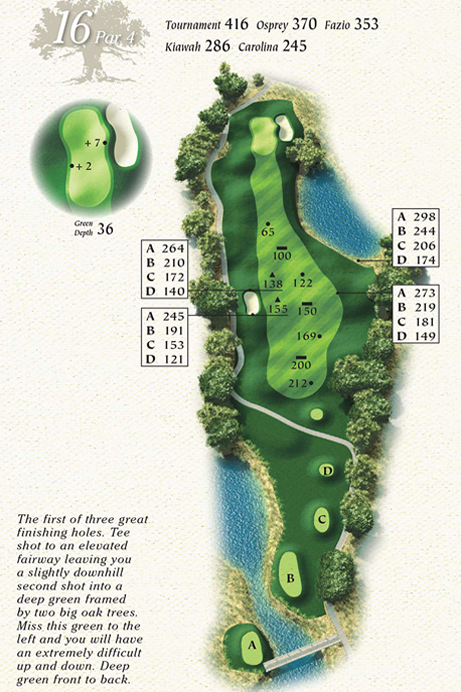
- Yardage:
416
Handicap: 12 - Yardage:
370
Handicap: 12 - Yardage:
353
Handicap: 12 - Yardage:
286
Handicap: 9 - Yardage:
245
Handicap: 9
Starting on 16, the final three holes all play in the same direction, which is commonly into the wind. A wide fairway is guarded on the left by a deep fairway bunker. Beyond the generous landing area, the fairway narrows as it drops down the hill. Long hitters need to aim down the left side of the fairway to avoid a pond that is blind from the tee and sits to the right of the lower fairway. Club selection and wind direction are very important when hitting into this very narrow and deep green.
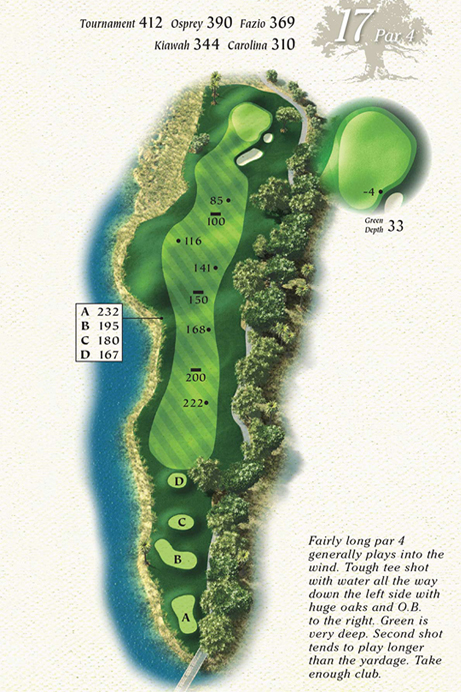
- Yardage:
412
Handicap: 4 - Yardage:
390
Handicap: 4 - Yardage:
369
Handicap: 4 - Yardage:
344
Handicap: 5 - Yardage:
310
Handicap: 5
The closing two holes finish up along the beautiful Canvasback Pond. This fairway starts out rather narrow and opens into a very wide landing area. Water left of the fairway is the most obvious hazard, but numerous oak trees all down the right side put a premium on playing from the fairway. This is another large green that falls off on both sides. A large bunker in the right approach makes it difficult to determine the hole location.
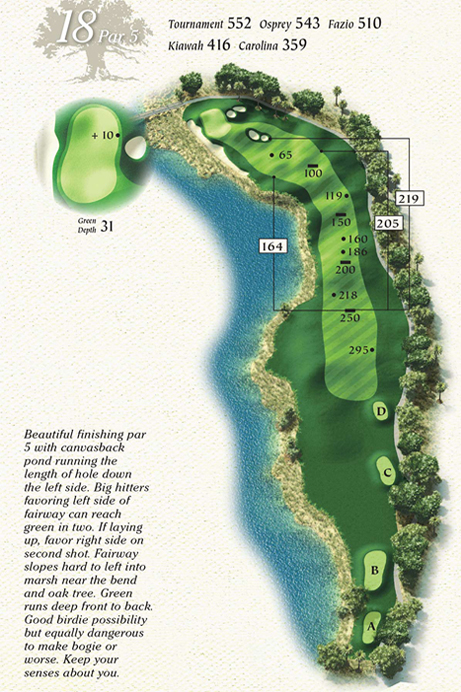
- Yardage:
552
Handicap: 6 - Yardage:
543
Handicap: 6 - Yardage:
510
Handicap: 6 - Yardage:
416
Handicap: 7 - Yardage:
359
Handicap: 7
Your final tee shot has a long carry to yet another generous fairway. Canvasback Pond should not come into play off the tee but will certainly challenge your second shot. The landing area is somewhat elevated and drops downhill as it wraps around the pond to the left. The wise play is to lay-up into the right half of this generous fairway. Two pairs of bunkers guard the approach and right side of the green while a long, deep bunker protects the left side. As long as you are not distracted by the beauty of this finishing hole, you should be rewarded with a good score to end your round.

Welcome to Osprey Point’s 19th hole. This clubhouse is home to our casual Cherrywood BBQ & Ale House and a wide veranda perfect for spotting the course’s famous alligators, in addition to private event spaces.

The Osprey Point Golf Shop features the latest golf styles with the famous Oak Tree logo for a day on the links from top brands – including Footjoy, Peter Millar, Holderness and Bourne, Johnnie O, and more. The golf shop also carries your equipment and accessories needs with a selection of golf bags, balls, shoes, and hats.
The golf shop is open daily from 7am until sunset, with seasonal changes to hours.
For Tee Times, call (843) 266-4640.


