
Plan Your Golf Vacation
800.576.1570
Oak Point Golf Course
The proud recipient of the 2019 Charleston Golf Course Owners Association Course of the Year, Oak Point delivers a superior playing surface with its regrassing in Paspalum and greater strategic challenges through a refreshed design. Originally conceived by Clyde Johnston, a noted Southeastern golf course architect, Oak Point sits by the Kiawah River and Haulover Creek, surrounded by maritime forest.
A true shotmaker’s course, Oak Point showcases undulating fairways and challenging greens on a meticulously maintained course that favors a thinking approach over raw power.
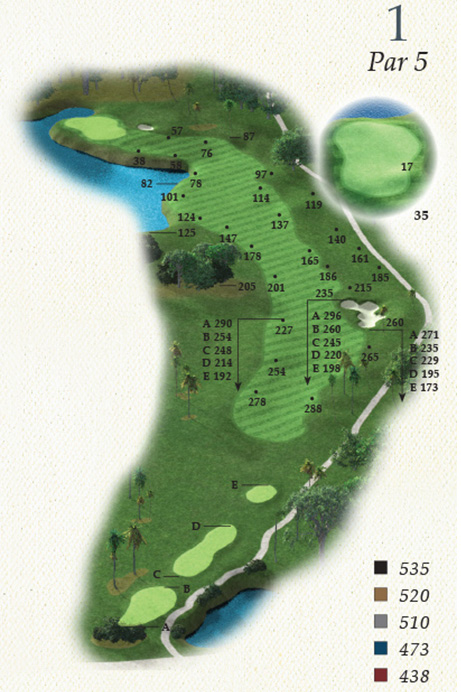
- Yardage:
535
Handicap: 7 - Yardage:
520
Handicap: 7 - Yardage:
510
Handicap: 7 - Yardage:
473
Handicap: 3 - Yardage:
438
Handicap: 3
Oak Point opens up with this dogleg left par 5. It delivers an excellent risk-reward second shot with water on the left and plenty of room on the right to leave a short approach shot. Favor the right side of the fairway to avoid the trees on the left that can block your second shot.
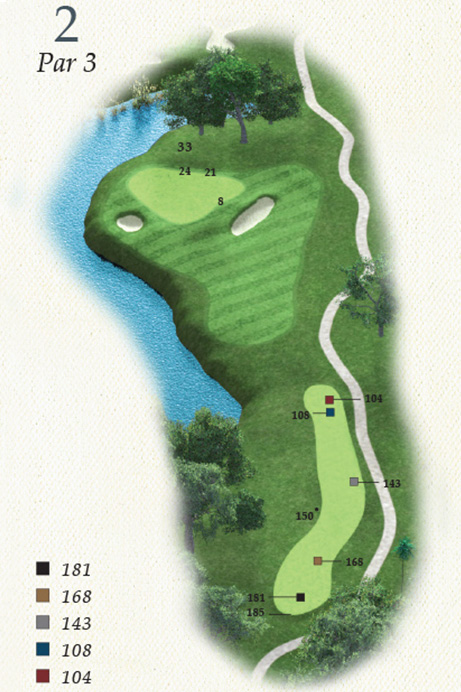
- Yardage:
181
Handicap: 17 - Yardage:
168
Handicap: 17 - Yardage:
143
Handicap: 17 - Yardage:
108
Handicap: 17 - Yardage:
104
Handicap: 17
A magnificent oak tree sets the backdrop to this challenging par 3 with a lagoon running down the left-hand side and a large green complex guarded by bunkers on both the left and right sides.
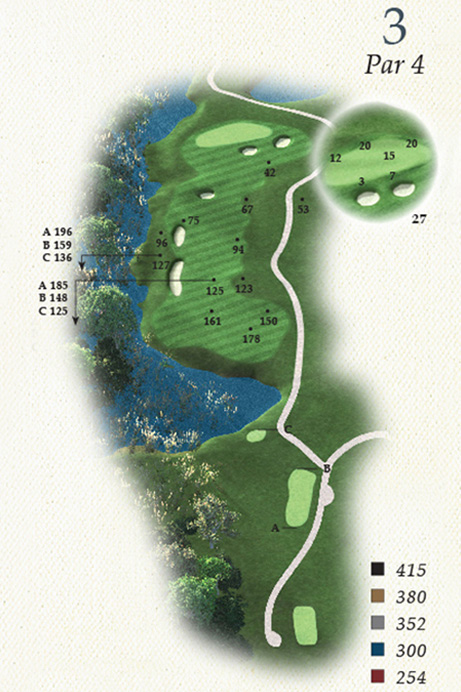
- Yardage:
415
Handicap: 9 - Yardage:
380
Handicap: 9 - Yardage:
352
Handicap: 9 - Yardage:
300
Handicap: 11 - Yardage:
254
Handicap: 11
This short par 4 has newly contoured fairways as well as two added fairway bunkers down the left side to guard against hitting the ball in the hazard. A well-played tee shot can leave you a short iron to the green with possibility of birdie.
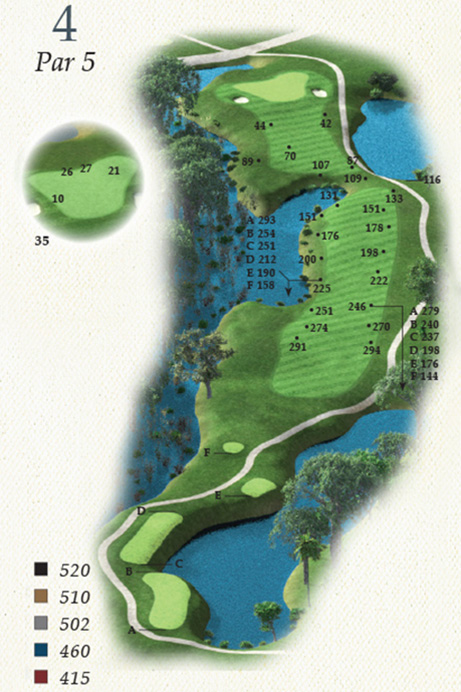
- Yardage:
520
Handicap: 3 - Yardage:
510
Handicap: 3 - Yardage:
502
Handicap: 3 - Yardage:
460
Handicap: 5 - Yardage:
415
Handicap: 5
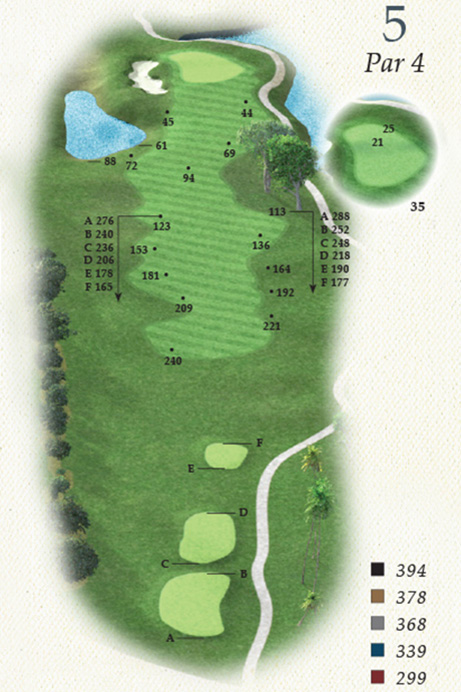
Standing on this tee, players can now see the water that runs down the left side of the hole. The ideal tee shot will favor the right side of the fairway. Players must consider the water that cuts across the fairway 135 yards from the green when deciding how to play their second shot. This green is large enough and very receptive for those that wish to go for the green in two.
- Yardage:
394
Handicap: 11 - Yardage:
378
Handicap: 11 - Yardage:
368
Handicap: 11 - Yardage:
339
Handicap: 7 - Yardage:
299
Handicap: 7
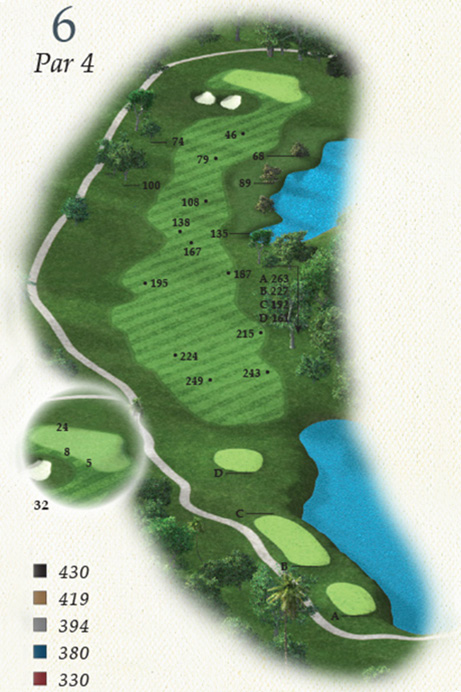
The ideal tee shot here is a right-to-left shot starting at the cluster of trees down the right side and working back to the middle of the fairway. This will leave you with a mid-iron into a two-tiered green where long brings the water behind the green into play.
- Yardage:
430
Handicap: 1 - Yardage:
419
Handicap: 1 - Yardage:
394
Handicap: 1 - Yardage:
380
Handicap: 9 - Yardage:
330
Handicap: 9
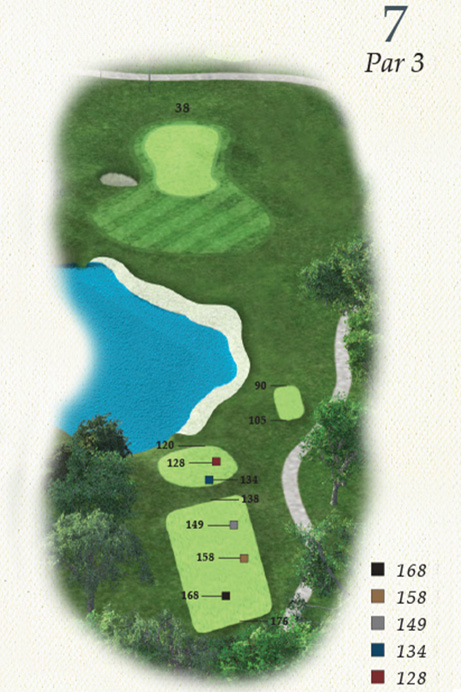
This 430-yard par 4 is beautifully framed by live oaks. A left-to-right tee shot will leave you a mid-to-long iron into a slightly elevated green. A left side pin location can be very difficult to attack due to the two left bunkers guarding the green. Aim for the middle right of the green. A two-putt par is a good score on this hole.
- Yardage:
168
Handicap: 15 - Yardage:
158
Handicap: 15 - Yardage:
149
Handicap: 15 - Yardage:
134
Handicap: 13 - Yardage:
128
Handicap: 13
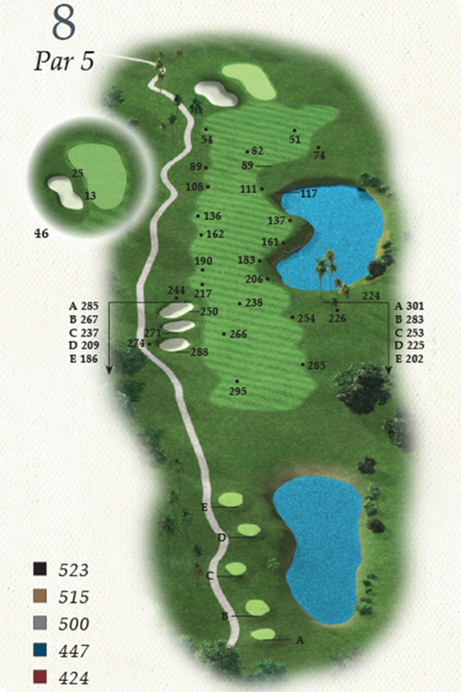
Club selection is critical to this par 3 that has a long, narrow green sloping left to right, which is guarded by a large oak on the right-hand side and a new bunker on the left. Missing the green makes for a difficult up and down.
- Yardage:
523
Handicap: 5 - Yardage:
515
Handicap: 5 - Yardage:
500
Handicap: 5 - Yardage:
447
Handicap: 1 - Yardage:
424
Handicap: 1
Oak Point’s third par 5 on the front side has a generous landing area off the tee. A well-struck second shot offers a great opportunity to land the ball near or on this right-to-left sloping green bringing birdie into play.
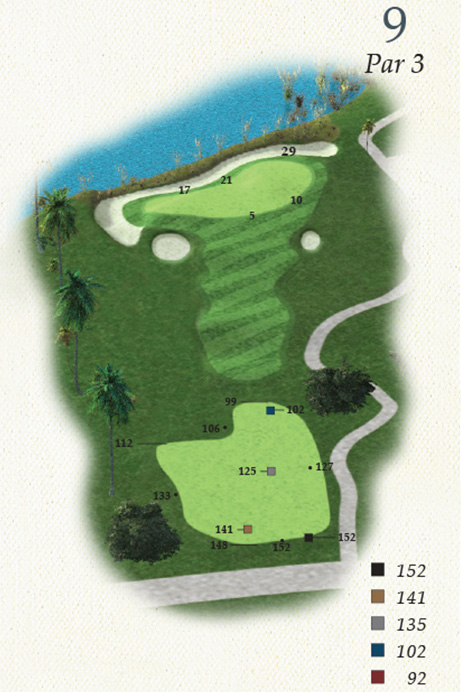
- Yardage:
152
Handicap: 13 - Yardage:
141
Handicap: 13 - Yardage:
135
Handicap: 13 - Yardage:
102
Handicap: 15 - Yardage:
92
Handicap: 15
This picturesque closing hole on the front side is a strong par 3 with a dramatic view of Haulover Creek as a backdrop. Do not be fooled by the relative shortness of this hole—the wind generally plays off the creek into you. This wide green can also leave an extremely long putt if you’re not accurate on the tee shot.
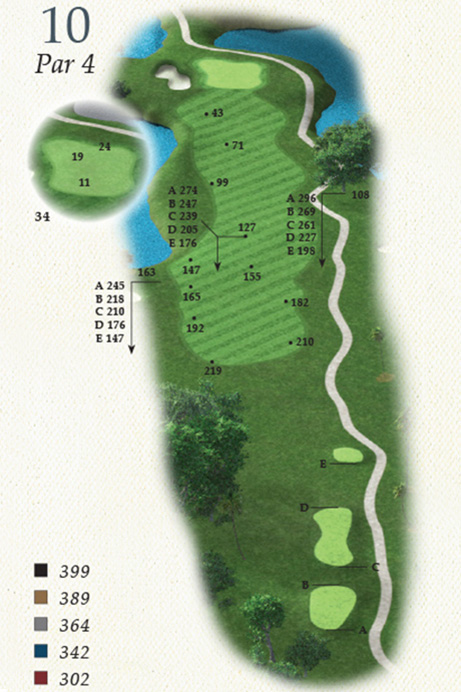
- Yardage:
399
Handicap: 10 - Yardage:
389
Handicap: 10 - Yardage:
364
Handicap: 10 - Yardage:
342
Handicap: 14 - Yardage:
302
Handicap: 14
An accurate tee shot is required for this fairway that narrows with a large oak tree on the right and lagoon on the left. Players who miss the fairway to the right may end up in the historical plantation cemetery. (We request you please take a drop if you happen to end up there.) Placement of your second shot is critical to this back-to-front sloped green. Leaving the ball above the hole can lead to a very difficult two-putt.
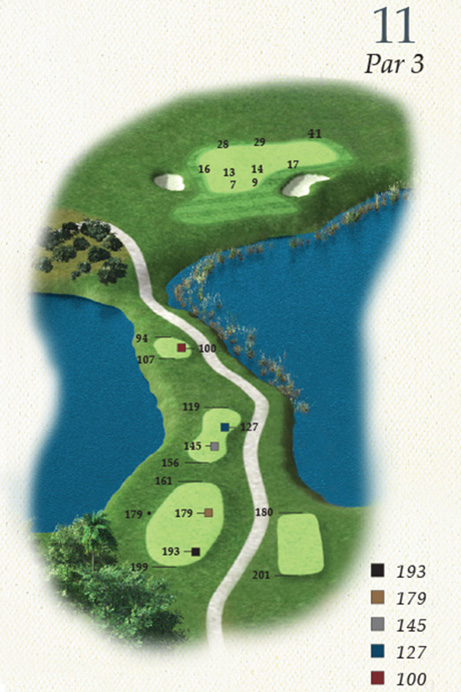
- Yardage:
193
Handicap: 14 - Yardage:
179
Handicap: 14 - Yardage:
145
Handicap: 14 - Yardage:
127
Handicap: 18 - Yardage:
100
Handicap: 18
The addition of a new tee box will allow players a new perspective of this challenging par 3, requiring a mid-to-long iron off the tee and into a tiered green sloping back-to-front. A mid-to-back right pin location on this elevated green guarded by a bunker can be a difficult task. Aim for the middle of the green to ensure a two-putt par.
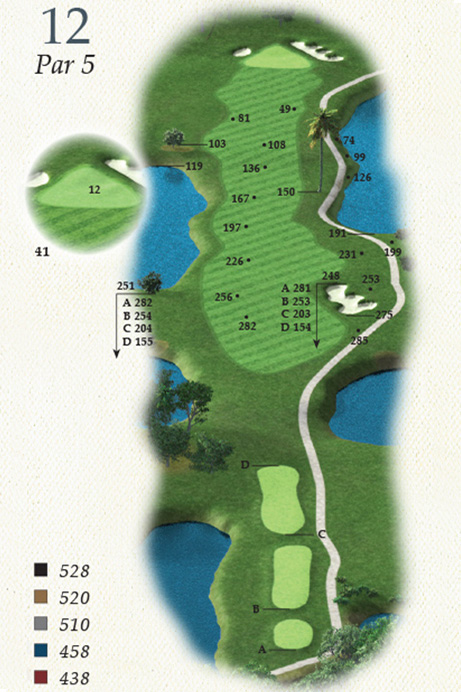
- Yardage:
528
Handicap: 8 - Yardage:
520
Handicap: 8 - Yardage:
510
Handicap: 8 - Yardage:
458
Handicap: 8 - Yardage:
438
Handicap: 8
This lightly uphill straightaway par 5 generally plays downwind, giving players the opportunity to attack the green in two or lay up for a short, challenging wedge shot to an elevated putting surface. The key to success is avoiding the lagoons on both sides of the fairway.
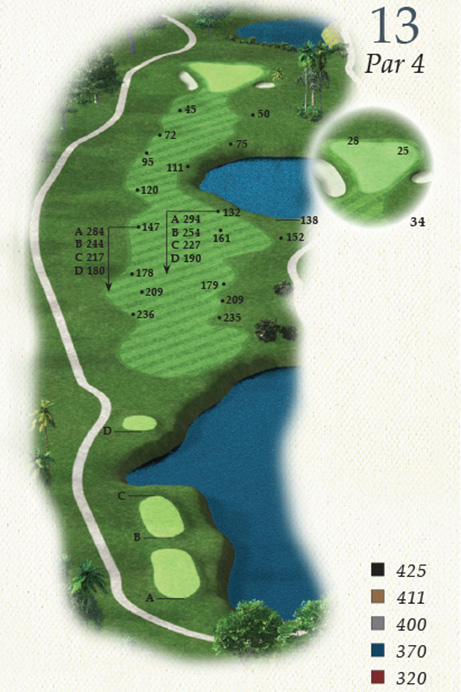
- Yardage:
425
Handicap: 6 - Yardage:
411
Handicap: 6 - Yardage:
400
Handicap: 6 - Yardage:
370
Handicap: 6 - Yardage:
320
Handicap: 6
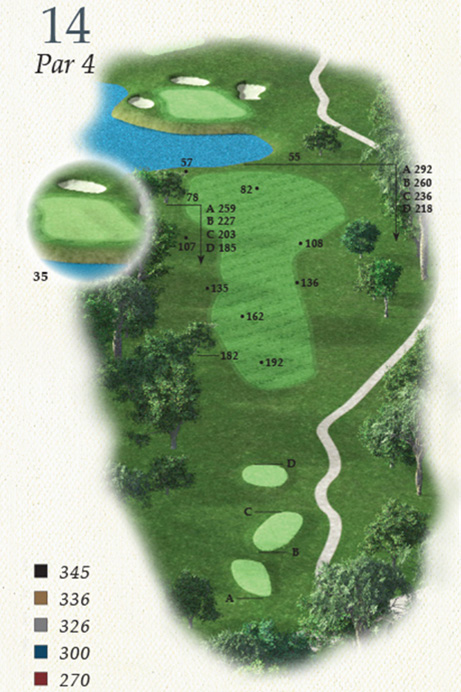
This relatively straightforward par 4 features a pond on the right that narrows the fairway for the longer hitters. Players will have a mid-iron into this green that is guarded by a large bunker left and a smaller bunker front right.
- Yardage:
345
Handicap: 12 - Yardage:
336
Handicap: 12 - Yardage:
326
Handicap: 12 - Yardage:
300
Handicap: 4 - Yardage:
270
Handicap: 4
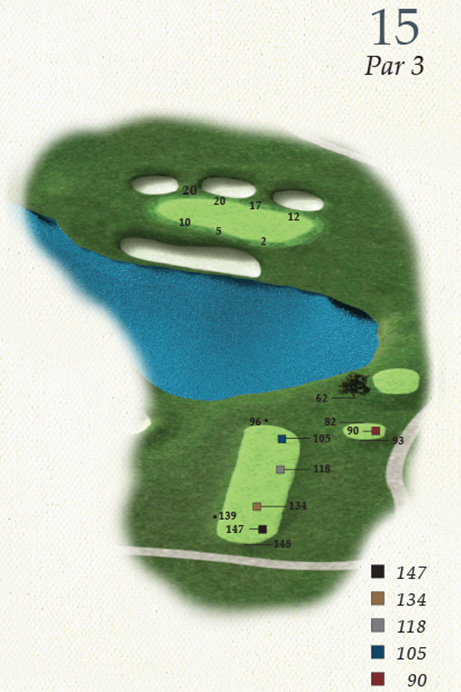
This short par 4 can be the most difficult driving hole on the course. A fairway wood or iron is the smart play off the tee to a narrowing fairway, leaving a short iron over a lagoon into this generous green guarded by back bunkers.
- Yardage:
147
Handicap: 18 - Yardage:
134
Handicap: 18 - Yardage:
118
Handicap: 18 - Yardage:
105
Handicap: 16 - Yardage:
90
Handicap: 16
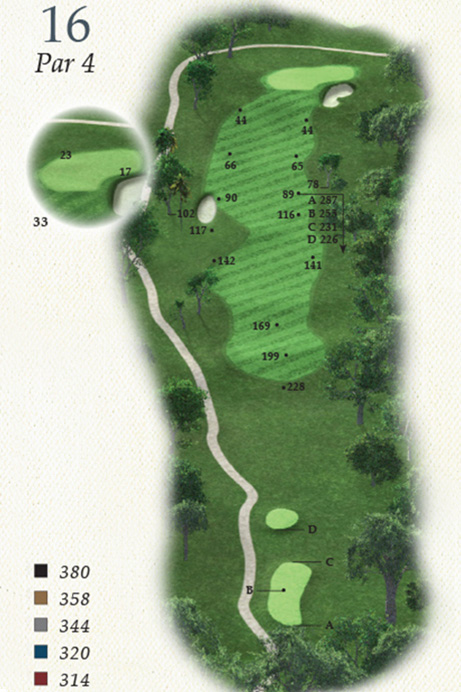
This short, yet challenging, par 3 calls for a short-to-mid iron over water to a wide but not very deep green. The surrounding tree line can make judging the wind difficult at times and the large bunker in front of the green or the three pot bunkers behind the green will make for a difficult up-and-down.
- Yardage:
380
Handicap: 16 - Yardage:
358
Handicap: 16 - Yardage:
344
Handicap: 16 - Yardage:
320
Handicap: 12 - Yardage:
314
Handicap: 12
This par 4 is not overly long, making accuracy a premium off the tee. Players will have a mid-to-short iron into this green that is protected by a large bunker on the right.
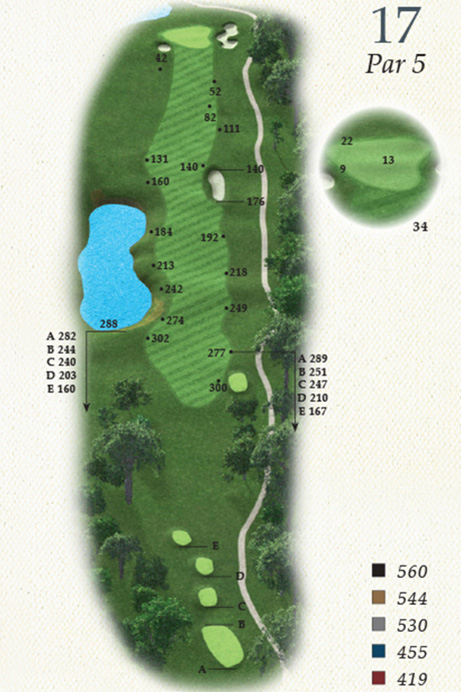
- Yardage:
560
Handicap: 2 - Yardage:
544
Handicap: 2 - Yardage:
530
Handicap: 2 - Yardage:
455
Handicap: 2 - Yardage:
419
Handicap: 2
The final par 5 on the course can play extremely long, especially into the wind. The narrow shoot from the tee makes for an intimidating tee shot. The fairway is actually very wide, with a pond reachable by the longer hitters on the left. An ideal second shot to the left side of the fairway will leave a shot to mid iron into an elevated green that is tiered with a severe drop from middle to front. Ball placement is critical to ensure a birdie or par rather than bogey.
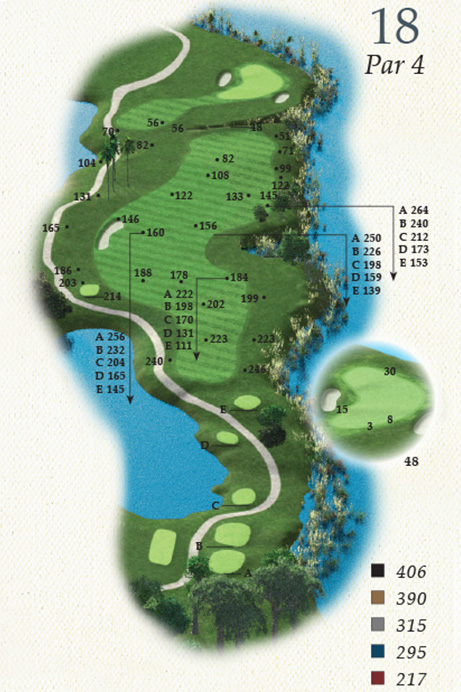
- Yardage:
406
Handicap: 4 - Yardage:
390
Handicap: 4 - Yardage:
315
Handicap: 4 - Yardage:
295
Handicap: 10 - Yardage:
217
Handicap: 10
The signature 18th hole at Oak Point offers a spectacular view of Haulover Creek and The Kiawah River. With the new addition of a back elevated tee box, this is a great photo opportunity for this picturesque hole. An ideal tee shot will work left-to-right off the fairway bunker into the center of the fairway, leaving a mid-iron into a deep green that is guarded by the marsh on the front and right side.

Everything you need to elevate your game and personal style on our courses can be found in the Oak Point golf shop, showcasing the most respected golf brands in the industry featuring the famous Oak Tree logo, including Peter Millar, Johnnie O, Greyson, and Footjoy. The golf shop carries a selection of golf bags and balls, shoes, hats, and sweaters to round out your golf needs.
The golf shop is open seven days a week from 7am-sunset, with seasonal changes to hours.
For Tee Times, call (843) 266-4100.


